Saturday 30 April 2016

How to Manually Attach Databases in Management Studio

In addition to the ability to integrate into the HELM Control Panel for the creation of new databases, Microsoft SQL Server provides users the capability to directly attach existing databases to an SQL instance with the use of SQL Server Management Studio.

Step 1

First, we will need to locate the databases files to attach by using Windows Explorer to navigate to them. In this case, we are attaching a database named, ‘example_db‘, located in the folder, ‘C:\Database‘, seen below.
kb-attach-db-mgmt-studio-1

Step 2

As you can see, there are two files which drive an SQL database: the ‘.MDF‘ file which contains the primary data, and the ‘.LDF‘ file which logs all transactions related to the database. Both files are necessary for the database to function correctly.
Now, we need to place them in the appropriate folder containing the other SQL databases on the server. Typically, this folder will be, ‘C:\Program Files\Microsoft SQL Server\MSSQL.1\MSSQL\Data‘, however, depending on the data directory specified during installation, the database files may be in a different location.
It is not a requirement that all database files be kept in the same location, as they technically can be attached from any location on the server, however for the sake of organization, we will place the files in the specified data folder. Start by highlighting both files, right-clicking on them and choosing ‘Copy‘.
kb-attach-db-mgmt-studio-2

Step 3

Next, using Windows Explorer, navigate to the data directory specified above, and paste the files into them by right-clicking anywhere in the empty space within the folder, and choosing ‘Paste‘.
kb-attach-db-mgmt-studio-3

Step 4

You will now see the database files have been pasted into the folder, located beneath the existing databases files.
kb-attach-db-mgmt-studio-4

Having Trouble Implementing This Solution?

Why not let our Microsoft® Certified Engineers do it for you.
Just $50.00 one time fee.
Request Immediate Expert Help 

Step 5

Now, we are ready to attach them. Open SQL Server Management Studio from the Start Menu. If the icon is not in the list of recently used programs, you can navigate to ‘All Programs –> Microsoft SQL Server 2005 –> SQL Server Management Studio’.
kb-attach-db-mgmt-studio-5

Step 6

Log in to Management Studio using your server’s name and Windows Authentication, and pressing ‘Connect‘.
kb-attach-db-mgmt-studio-6

Step 7

Once logged in, click the plus sign next to the ‘Databases‘ heading to see a list of existing databases within the SQL instance.
kb-attach-db-mgmt-studio-7

Step 8

Right-click on ‘Databases‘, and choose ‘Attach‘ from the list of available options.
kb-attach-db-mgmt-studio-8

Step 9

This will bring up the Attach Databases window. Click the button which says ‘Add‘.
kb-attach-db-mgmt-studio-9

Step 10

You should now be able to see a list of existing databases on the server, as Management Studio will default to the data directory mentioned above. Click on the database you wish to attach, ‘example_db.mdf‘, in this case, and click OK.
kb-attach-db-mgmt-studio-10

Step 11

Back at the Attach Databases window, it will confirm the locations of the primary data and transaction log files. ClickOK.
kb-attach-db-mgmt-studio-11

Step 12

As you can see, the database is now attached to the SQL instance.
kb-attach-db-mgmt-studio-12

Step 13

Now, we need to create a user for the database to allow for external connectivity. Click the plus sign next to ‘Security‘, right-click the Logins‘ folder and click ‘New Login‘.
kb-attach-db-mgmt-studio-13

Step 14

There are many options on the New Login windows which need to be set for the database user to be created successfully:
  • Enter your desired name for the database user in the Login Name field.
  • Set the user to use SQL Authentication, to allow for external connectivity.
  • Enter in and confirm your desired password.
  • Uncheck the option for ‘Enforce password expiration‘, which will in turn disable the option for ‘User must change password at next login‘.
  • Next to the ‘Default Database‘ drop-down menu, select the manually attached database.
kb-attach-db-mgmt-studio-14

Step 15

Once your desired options are set, click the option in the left-hand menu which says ‘User Mapping‘.
kb-attach-db-mgmt-studio-15

Step 16

In the User Mapping windows, there are two options which need to be set. The first is to place a check-mark next to the manually attached database in the ‘Map‘ column. Then, in the list of Database Membership Roles, place a check mark next to the ‘db_owner‘ role. Click OK once the options are in place.
kb-attach-db-mgmt-studio-16

Step 17

The newly created user can now be seen in the list of all SQL users within the instance.
kb-attach-db-mgmt-studio-17
You have now manually attached an SQL database using Management Studio. If you have any questions or concerns regarding this procedure, feel free to contact our Technical Support Department for assistance.
Thursday 28 April 2016

Installing Failover Clustering With Windows Server 2008 R2

Creating a failover clustering means you have at least two servers connected to a shared storage. 

Failover Clustering System Requirement:
  • Windows Server 2008/R2 : Failover Clustering feature is available with Windows Server 2008/R2 Enterprise/Data Center editions. You don't have this feature with the Standard edition of Windows Server 2008/R2.
  • Domain role: All servers in the cluster must be in the same Active Directory domain.
  • DNS: The servers in the cluster must be using Domain Name System (DNS) for name resolution.
  • Account for administering the cluster : When you create a cluster or add servers to it, you must be logged on to the domain with an account that has administrator rights on all servers in that cluster ( if the account is not a Domain Admins account, the account must be given the Create Computer Objects and Read All Properties permissions in the domain ).
  • Servers : Two identical servers in brand, model and configurations.
  • Device Controllers ( HBA ) : i/SCSI or Fiber , both also to be the identical.
  • Storage : You must use shared storage that is compatible with Windows Server 2008 R2.

Now that you know the requirement for Failover Clustering, lets start:
Configuration on Server A
  1. To install Failover feature, open Server Manager, click on Start > Administrative Tools > Server Manager
  2. Expand Features, and then click on Add Feature.


    The list of available features will be listed, select the Failover Clustering and click on Next


    Click Install


  3. The Failover Clustering feature will be installed. Click Close


Configuration on Server B
  1. Again on Server B, we will need to install Failover Clustering feature as well, so click on Start > All Programs > Administrative Tools >Server Manager


    Click on Features and then click on Add Features


  2. Choose the Failover Clustering feature and click Next


  3. Confirm installing Failover Clustering by clicking on Install


    Close the Add Features Wizard once installation is completed. 

Now that both servers have Failover Clustering feature installed on them, we can create the cluster on one of these server and join the other one to the cluster.
Now, we need to open and configure our cluster name, IP and nodes.

To open Failover Clustering, click on Start > Administrative Tools > Failover Cluster Manager

>> This needs to be done on a single server only <<


  1. The first step in creating a successful failover clustering, is by validating the existing systems and shared storage. This is done by the optionValidate a Configuration


    When you click on Validate a Configuration, you will need to browse and add the Cluster nodes, these are the servers that will be part of the cluster, then click Next


    Choose to Run all tests and click Next


    The available tests will be displayed in the confirmation window, click Next to begin validating your cluster


    Review the validation report, as your configuration might have few issues with it and needs to be addresses before setting up your cluster.


  2. Now that the configuration is validated and you are ready to setup your cluster. Click on the second option, Create a Cluster, the wizard will launch, read it and then click Next


  3. You need to add the names of the servers you want to have in the cluster. You can start creating your cluster with a single server and then add other nodes in the future.

    Browse to your servers and then once all the servers ( nodes ) are listed, click Next


  4. After the servers are selected, you need to type a name and IP for your Cluster


  5. On the Confirmation window, review your settings. The following will be displayed in this window: cluster name and IP address, selected servers name. If all info is proper, then click Next. Else click Previous and correct which setting needs to be adjusted.


    After you click Next, creating the cluster will begin.
  6. The summary windows will be displayed after a successful setup of the cluster. 


  7. Open Failover Cluster Manager and you will see your nodes and setting inside the MMC. Here you can configure your cluster, add new nodes, remove nodes, add more disk storage and so on.


Summary

In this article, I have created a two node cluster using Failover Clustering feature which is available with Windows Server 2008 R2 Enterprise and Data Center editions.

Wednesday 20 April 2016

How to create a trace from sql server profiler

In this post i would like to demonstrate how to create and run a trace on a SQL Server.
Let us start by understanding what a trace does for us. It helps us gather events that are happening on the instance. These events gathered, help us analyze and understand the state of the SQL server or help us understand any specific issue that we are troubleshooting. Let us understand this with an example:
Step 1: Open SQL Server Management Studio(SSMS)
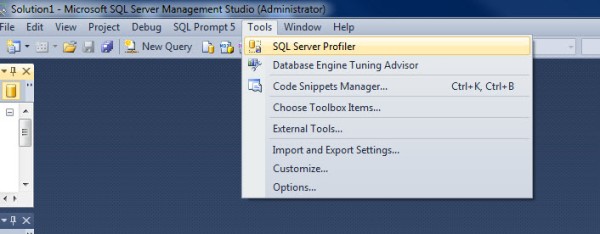
Step 2: Click on Tools -> Click on SQL Server Profiler
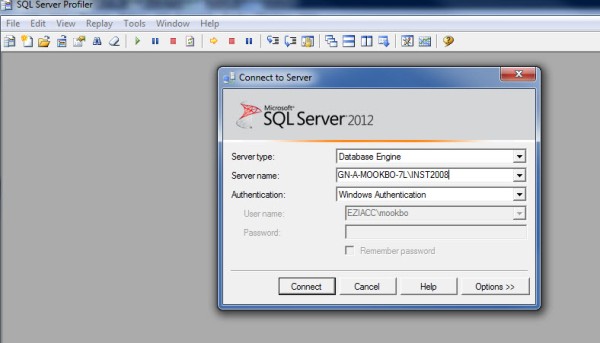
CT1Step 3: Once Profiler opens it will ask for the name of the SQL server on which you want to run the trace
CT2Step 4: In the next window we need to feed the profiler with what we want to capture such as events,template. We can also set a stop time for the trace to stop automatically. The general tab also allows to decide where we want to save the trace file i.e we can either save the trace file as a file or save the data as a table in a database. Apart from that the template drop down helps us decide what kind of data we would like to capture. In our example we will save the trace in a file. We also need to set the maximum file size and if a file would roll over in case the maximum limit is breached.
CT3Step 5: Now let us click on next tab “Events Selection”
CT4Step 6: Check the “Show all events” and “Show all columns” options. Scroll down to the “Stored procedures” events and check the below marked options. Then scroll down to the “TSQL” events and check the following options as below
CT5CT6Step 7: On the same tab we would see to buttons “Column Filters” and “Organize Columns”. Click on “Column Filters” and browse through the options it brings along. you might want to filter out any particular aspect of the system on which you want to collect data. In this example we would select the below
CT8Step 8: Click on OK and our trace is ready to run. Click on Run and you would see the trace capturing data
CT9Step 9 : To Stop the trace click on the stop button
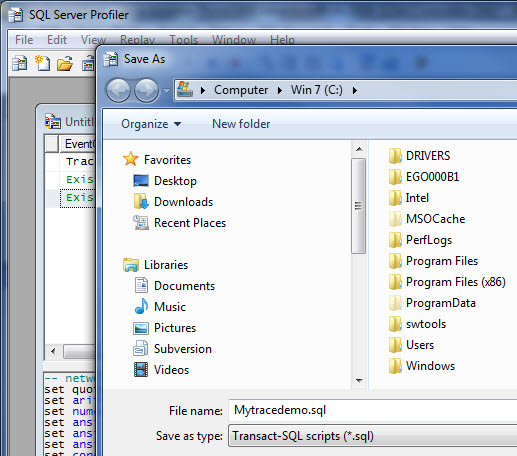
CT11If we want we can save the definition of the trace as a T-SQL script. This is how we would achieve the same.
Step 1: Click on File -> Export -> Script Definition -> For SQL Server 2005 – 2008 R2
CT12Step 2: Save the SQL script in a desired Location
CT13In the next post i will demonstrate how to use this SQL script for later use for capturing data. I hope this demo was useful.